[rant] I think I may need to come up with some other way to label the games. It is pretty tough to know how many games you have played on KGS if you use any level of qualification around it. Do you count a game where your opponent escapes after 10 moves? What about a free 9x9 against a player that just started (a true 30k)? A teaching game? All these show up as games played on KGS, but not all games provide a player with learning opportunities. [/rant]
I think the game I labeled Game #11 is a close enough match that it is interesting. I put a comment on every move and I hope I captured the thinking process and vision I had of what was going on. With any luck I will get stronger. Then, I hope when I look back on this game (and other commented games) I will understand what important things I am currently blind to. If that understanding can be put into words I will have some insights to share.
Seems a reasonably modest goal...until I realize that the game has been played for 3000 years! Why do I think I can explain the steps needed to advance better than all the other players and teachers before me? I'm not sure why I think I can, or why that seems motivating. But I am motivated to try and I do think - in some small way - I can be successful.

Wednesday, April 30, 2008

Sunday, April 27, 2008
Urgent before Big
The proverb is "Play urgent moves before big moves". I think it is a bit hard for the beginner to know how to follow this, but I sure found a great example of NOT following this in my own game. Maybe this sequence will help you follow the proverb.

I was playing white. Above is the result of my 3-3 invasion. The black group at the bottom has only 2 liberties, and my 7 stone group has 4. The only cutting point is at S3, and even if black plays there, I can kill black's 5 stone group faster and live. I make a mental note to remember I need to be careful about the cut at S3, but I don't move there. I decide all is well, and my next move is a "big" move in the center of the board.

About 50 moves later, we return to this corner group. Not only is the set of stones that I had before still there, I have expanded a bit on the bottom. Black seals the border with J1 - he also puts my 3 stones on the left in atari. I continue to assume that my 8 stone group is alive and well. I don't pay attention to the fact that I had some worry down here, and I play without thinking.

I quickly save the 3 stones that were in atari by connecting. Doh! Bad move. It was a reaction rather than a thinking move. If I had looked at things a bit longer I would have seen the play at L3. L3 takes the black stone at L2. If black plays at L4 (threatening to retake by playing L2 next, I could have played L2 myself and gained an eye at M1. Not only did I lose that eye, I filled in my own liberty! Now my large group has only 2 liberties.

Black does the right thing and punishes me for my mistake. He cuts at S3 and leaves my group in atari. My 12 stone group is dead and Black claims the entire corner.
The toughest thing about this was that I lost the game by 19.5 points. My mistake in this corner cost more than enough to switch the win from white to black.
Looking back I want to call a play at S3 "urgent for white". Playing that one stone would have won the game. I could even have played it as late as when black put my 3 stones in atari. I would have traded 3 stones for the corner - definitely a better deal.
Next time I hear myself making mental notes about an area, I will try to recognize that I am seeing an urgent move. The other half of that is, when you see yourself wanting to tenuki (play someting "big" on another party of the board) remember this proverb and recheck the current area - can you really leave it safely? Last thing, I am going to try to force myself to count the liberties of the group I plan to play a stone in, before playing it. Hopefully that will help me see that a group is in danger earlier.

I was playing white. Above is the result of my 3-3 invasion. The black group at the bottom has only 2 liberties, and my 7 stone group has 4. The only cutting point is at S3, and even if black plays there, I can kill black's 5 stone group faster and live. I make a mental note to remember I need to be careful about the cut at S3, but I don't move there. I decide all is well, and my next move is a "big" move in the center of the board.

About 50 moves later, we return to this corner group. Not only is the set of stones that I had before still there, I have expanded a bit on the bottom. Black seals the border with J1 - he also puts my 3 stones on the left in atari. I continue to assume that my 8 stone group is alive and well. I don't pay attention to the fact that I had some worry down here, and I play without thinking.

I quickly save the 3 stones that were in atari by connecting. Doh! Bad move. It was a reaction rather than a thinking move. If I had looked at things a bit longer I would have seen the play at L3. L3 takes the black stone at L2. If black plays at L4 (threatening to retake by playing L2 next, I could have played L2 myself and gained an eye at M1. Not only did I lose that eye, I filled in my own liberty! Now my large group has only 2 liberties.

Black does the right thing and punishes me for my mistake. He cuts at S3 and leaves my group in atari. My 12 stone group is dead and Black claims the entire corner.
The toughest thing about this was that I lost the game by 19.5 points. My mistake in this corner cost more than enough to switch the win from white to black.
Looking back I want to call a play at S3 "urgent for white". Playing that one stone would have won the game. I could even have played it as late as when black put my 3 stones in atari. I would have traded 3 stones for the corner - definitely a better deal.
Next time I hear myself making mental notes about an area, I will try to recognize that I am seeing an urgent move. The other half of that is, when you see yourself wanting to tenuki (play someting "big" on another party of the board) remember this proverb and recheck the current area - can you really leave it safely? Last thing, I am going to try to force myself to count the liberties of the group I plan to play a stone in, before playing it. Hopefully that will help me see that a group is in danger earlier.
KGS Ranking System
KGS seems determined to keep me from playing even strength players with no handicap. It bugged me at first, but now I am coming to terms with it. I guess the insight is: KGS has a ranking system, but it is not stable at higher kyus. There is a lot of inconsistency in the 20k - 30k skill band. There are multiple reasons for this as far as I can tell:
- Churn - There are a lot of new players. Many play a few games and give up. So there is a constant turn over of temporary players.
- Sandbagging - There are strong players that create a second account so they can pummel noobs.
- Good Students - These are the new folks that stick to it and start to get better. The kyu rank KGS gives them is off because they are rapidly gaining strength.
- Small Population - After removing all of the above you may have a few players that are accurately ranked, are sticking with it, but are truly 20k+ players.
- Non-interacting Pockets - Of these real 20k+ players, there are groups that may never play against each other, so the ratings aren't equal. Imagine a small group of friends that only play each other (after establishing ranks around 25k). Lets say they all improve 10 stones in skill, but just by playing each other. Their ranks will all still be around 25k, when they are really 15k if they played against the rest of the KGS population.
- Don't stress out - Have low expectations around exactly what will happen in your initial games online.
- Play all challengers - Don't just lurk and hope the perfect game for you gets put up by someone else. Create your own custom game, make sure it is ranked, and then play whoever is available.
- Get 25 games done fairly quickly - This sort of goes along with the original proverb "Lose 100 games quickly", but for KGS I would change it to "Play 25 Ranked KGS games quickly". Once you have done that you should have a pretty decent understanding of how KGS works and your rating should be fairly accurate. (By the way, 25 isn't a special number, really just a guess...)
Monday, April 21, 2008
Some "noise" in my planned games
I looked to play another rated game recently and try to get rid of my KGS question mark. When I logged on there were no players I could find in the 20 kyu - 30 kyu skill range. I put up a game and was challenged by a 4 kyu. Even though he gave me 4 stones it wasn't much of a battle.
Then I played another rated game against a '?' player and was losing. My opponent chose to escape rather than finish the game. I have looked him up since and see that his rating has started to stabilize at around 13k. So, I have yet to win a rated game, and my KGS graph looks like this:

(How do you get a graph with 8 points when you have only played 3 rated games - one which was escaped by a ? player...riddle me that!)
My ego is having a hard time believing I am a 27k, but I need to win a game before I can say anything. Hopefully there will be some 20k-ish folks on next time I go to play.
My attempt at a perfectly controlled science experiment has been foiled! Hehe. I won't get to choose exactly what skill level my opponents will be and my attempt to play 100 more-or-less even games in a row isn't going to happen as I envisioned it. I still feel that I can proceed with the general goal, so I will. So, bottom line is that I am not counting either my loss to the 4k or the unfinished game as "Game #4". I will try to get in games 4 and 5 soon.
Then I played another rated game against a '?' player and was losing. My opponent chose to escape rather than finish the game. I have looked him up since and see that his rating has started to stabilize at around 13k. So, I have yet to win a rated game, and my KGS graph looks like this:

(How do you get a graph with 8 points when you have only played 3 rated games - one which was escaped by a ? player...riddle me that!)
My ego is having a hard time believing I am a 27k, but I need to win a game before I can say anything. Hopefully there will be some 20k-ish folks on next time I go to play.
My attempt at a perfectly controlled science experiment has been foiled! Hehe. I won't get to choose exactly what skill level my opponents will be and my attempt to play 100 more-or-less even games in a row isn't going to happen as I envisioned it. I still feel that I can proceed with the general goal, so I will. So, bottom line is that I am not counting either my loss to the 4k or the unfinished game as "Game #4". I will try to get in games 4 and 5 soon.
Tuesday, April 15, 2008
Destroying Eyes
Groups in GO need 2 eyes to be alive. So, if you could block your opponent from making any eyes in their groups, you would have a strong chance to win. To effectively block the creation of eyes we should look at what it takes to make an eye.

Above is the basic scenario for making an eye. If we want an eye on the star-point above, we need to have a stone of our color on 7 of the 8 spots around it - we can skip one diagonal. Anything less means the star-point will likely not become an eye for us. Let's look at some situations where we don't have the right 7 spots covered.
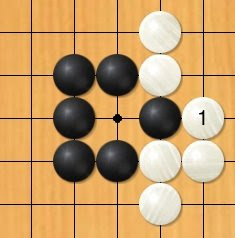
Above here we have a classic "false eye". When 2 of the diagonal spots around your eye have been captured by the opponent, the eye is in danger. You can see, white just played "1" and has put a black stone in atari. We could save that stone by extending...but that would fill in the eye. If we don't save the stone, white will capture it and take over our eyespace.

Here is another situation, but with even worse problems! Here white has captured 2 opposite diagonals around our eyespace. Now there are 3 black stones in atari. This is another example of a false eye. We either need to fill it to save our stones, or let our opponent capture them and take over the space. So, if an opponent gets any 2 of the diagonals around a spot you want as an eye, it is a false eye.

What about if you get all the diagonals, but give up 1 horizontal spot? You can see that in the picture above - does black have an eye? No. The star-point that black wanted as an eye is now a neutral point on the board. It is in "no man's land", it is worth no points to either player, and could be filled in by either, but it won't become an eye. Losing 1 horizontal spot around an eye is all it takes to lose that eye.

So, now you can add "destroying eyes" to your strategy. Imagine you are white, playing the game above. You can see that black may try to build an eye at the star-point. If you play at the X, you will take one of the horizontal spots around the eyespace, and that eye will be lost.

Above is the basic scenario for making an eye. If we want an eye on the star-point above, we need to have a stone of our color on 7 of the 8 spots around it - we can skip one diagonal. Anything less means the star-point will likely not become an eye for us. Let's look at some situations where we don't have the right 7 spots covered.

Above here we have a classic "false eye". When 2 of the diagonal spots around your eye have been captured by the opponent, the eye is in danger. You can see, white just played "1" and has put a black stone in atari. We could save that stone by extending...but that would fill in the eye. If we don't save the stone, white will capture it and take over our eyespace.

Here is another situation, but with even worse problems! Here white has captured 2 opposite diagonals around our eyespace. Now there are 3 black stones in atari. This is another example of a false eye. We either need to fill it to save our stones, or let our opponent capture them and take over the space. So, if an opponent gets any 2 of the diagonals around a spot you want as an eye, it is a false eye.

What about if you get all the diagonals, but give up 1 horizontal spot? You can see that in the picture above - does black have an eye? No. The star-point that black wanted as an eye is now a neutral point on the board. It is in "no man's land", it is worth no points to either player, and could be filled in by either, but it won't become an eye. Losing 1 horizontal spot around an eye is all it takes to lose that eye.

So, now you can add "destroying eyes" to your strategy. Imagine you are white, playing the game above. You can see that black may try to build an eye at the star-point. If you play at the X, you will take one of the horizontal spots around the eyespace, and that eye will be lost.
19x19 - Center vs Edge of the Board
Take a look at the following position:

Who has surrounded more territory - black on the outside, or white on the inside? This was an "aha!" moment for me when I first saw this question and heard the answer. Black has claimed 136 points on the outside and believe it or not, white can only claim 121 points on the inside. The point is: the outside of the board is very valuable!
Not only are there a lot of points available at the corners and the edges, they are actually "cheaper" to surround.

Above we have 3 groups of stones, each group surrounds 9 points of territory. Look how many moves it takes to get 9 points in the corner, on the side, and in the middle. You have to work twice as hard to get the points in the middle (12 stones) as compared to the corner (6 stones). Capturing territory on the side is right in the middle in terms of cost (9 stones).
These 2 "facts of geometry" on the GO board should help you see why it makes sense to try to claim the corners first, then the sides, and finally wrestle for the middle.
Interesting sidenote: 19x19 is the largest board one can have where the outer 2 rows are more valuable than the points inside the 4th row. I guess the game would play differently on a 21x21 board!

Who has surrounded more territory - black on the outside, or white on the inside? This was an "aha!" moment for me when I first saw this question and heard the answer. Black has claimed 136 points on the outside and believe it or not, white can only claim 121 points on the inside. The point is: the outside of the board is very valuable!
Not only are there a lot of points available at the corners and the edges, they are actually "cheaper" to surround.

Above we have 3 groups of stones, each group surrounds 9 points of territory. Look how many moves it takes to get 9 points in the corner, on the side, and in the middle. You have to work twice as hard to get the points in the middle (12 stones) as compared to the corner (6 stones). Capturing territory on the side is right in the middle in terms of cost (9 stones).
These 2 "facts of geometry" on the GO board should help you see why it makes sense to try to claim the corners first, then the sides, and finally wrestle for the middle.
Interesting sidenote: 19x19 is the largest board one can have where the outer 2 rows are more valuable than the points inside the 4th row. I guess the game would play differently on a 21x21 board!
Ladders and a Joke
A ladder is a basic form that happens often on the GO board. In its most basic form, it happens when one group of 5 stones puts a pair of connected stones in atari. It is something you need to know about so you can avoid getting caught in one. It is fundamental enough that the proverb is "If you don't know ladders, don't play GO".

Here we have a bunch of stones that could become a ladder. If black gets one more stone on C17 or D17 he will put white in atari.

Here we see the ladder. Black puts white in atari with C17, white extends to get 2 liberties, black takes one and it is atari again. Repeat until you reach the wall. Notice the zig-zag, stair step pattern made by the white stones - this is the signature of a ladder. By choosing to start the ladder with C17, black pushed white up and to the right. If he had chosen D17 instead, he could push up and to the left.

As the ladder approaches a side, black has to break the pattern a little to avoid an atari of a stone against the side, but as you can see above, one more black stone will kill the entire white group! (White at D19 leaves C19 for black as the capturing move.)

Ladders are deadly, but sometimes they don't work. All white needs is one extra stone to help escape the deadly ladder. Stones that do this are called "ladder breakers". Set this up on a board and see why both A16 and F18 are ladder breakers. One breaks the ladder started with C17 and the other breaks the D17 ladder. As the ladder pattern forms those breakers give white an atari on a single stone in the ladder that helps escape the atari on the large ladder group.

Potential ladders are formed on the board all the time - can you find any in the diagram above? The player who gets to go next can start a ladder on their opponent.
So, now you know about ladders! A few more thoughts to deal with them in game. If you see you are caught in a ladder, look to see if you have any ladder breaker stones to help you escape. If you don't, stop trying to save the group and play elsewhere. If your opponent doesn't kill the group instantly, try to play a ladder breaker sometime later. If your opponent misreads the purpose of that stone and doesn't kill the group in the ladder, you can now return to playing and breaking out of it. Secondly, if you are in a game where you have a ladder or are caught in a ladder that you can break, play it out to the end! Get as much advantage as you can with the ladder - drive it as far as you can before capturing or breaking it. This should only happen if your opponent doesn't know about ladders (although there are known games by professionals where they misread ladders).
Well, that was a long post just to set up the following joke (which I found on another blog somewhere):

Here we have a bunch of stones that could become a ladder. If black gets one more stone on C17 or D17 he will put white in atari.

Here we see the ladder. Black puts white in atari with C17, white extends to get 2 liberties, black takes one and it is atari again. Repeat until you reach the wall. Notice the zig-zag, stair step pattern made by the white stones - this is the signature of a ladder. By choosing to start the ladder with C17, black pushed white up and to the right. If he had chosen D17 instead, he could push up and to the left.

As the ladder approaches a side, black has to break the pattern a little to avoid an atari of a stone against the side, but as you can see above, one more black stone will kill the entire white group! (White at D19 leaves C19 for black as the capturing move.)

Ladders are deadly, but sometimes they don't work. All white needs is one extra stone to help escape the deadly ladder. Stones that do this are called "ladder breakers". Set this up on a board and see why both A16 and F18 are ladder breakers. One breaks the ladder started with C17 and the other breaks the D17 ladder. As the ladder pattern forms those breakers give white an atari on a single stone in the ladder that helps escape the atari on the large ladder group.

Potential ladders are formed on the board all the time - can you find any in the diagram above? The player who gets to go next can start a ladder on their opponent.
So, now you know about ladders! A few more thoughts to deal with them in game. If you see you are caught in a ladder, look to see if you have any ladder breaker stones to help you escape. If you don't, stop trying to save the group and play elsewhere. If your opponent doesn't kill the group instantly, try to play a ladder breaker sometime later. If your opponent misreads the purpose of that stone and doesn't kill the group in the ladder, you can now return to playing and breaking out of it. Secondly, if you are in a game where you have a ladder or are caught in a ladder that you can break, play it out to the end! Get as much advantage as you can with the ladder - drive it as far as you can before capturing or breaking it. This should only happen if your opponent doesn't know about ladders (although there are known games by professionals where they misread ladders).
Well, that was a long post just to set up the following joke (which I found on another blog somewhere):
Q: How many 30-kyus does it take to change a light bulb?
A: They can't do it, because they don't see the ladder.
Subscribe to:
Posts (Atom)